


Creating Sims 4 Walls: discussion, best practices and more
Oct 19, 2014 5:55:19 GMT -5
midnightpearl, yunanesca, and 12 more like this
Post by simension on Oct 19, 2014 5:55:19 GMT -5
Hello Simmers,
I love walls (and floors as well) and Sims 4 basegame is missing lots of the good ones. Currently I am working on new walls and on the way there is much to discover. First discovery I made on walls: There are 2 different kind of textures. I would like to share my discoveries with you fellow simmers and hope for your input as well. Let us explore techniques and develop best practices on wall creation together.
Topics covered in this Thread:
Walls with standard textures
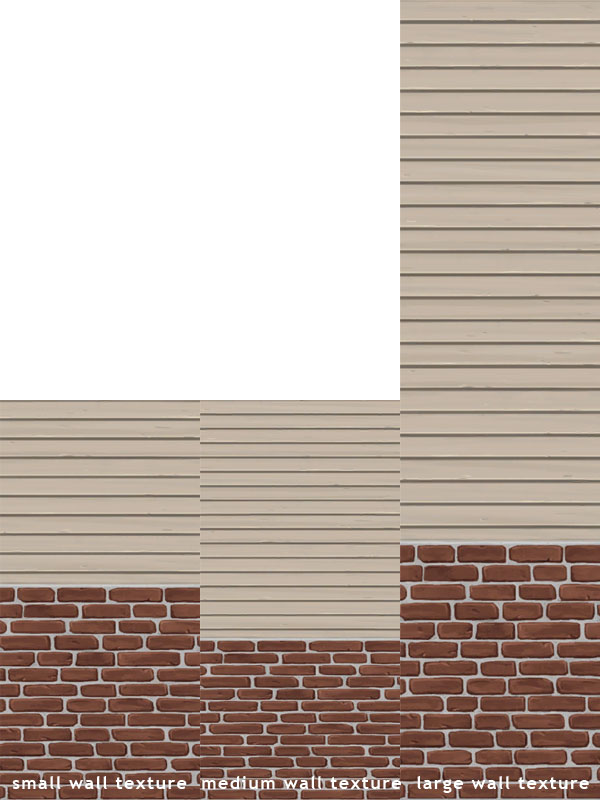
The standard is the small one with 256px width.
Fig. 1 Here are exports of the three wall heights textures of an original single tile wall:
Creating single tile textures
Textures will be stretched ingame. Thus it is neccessary to create them as larger textures and compressing them before saving for the game.
Fig. 2 Creating Standard Walls
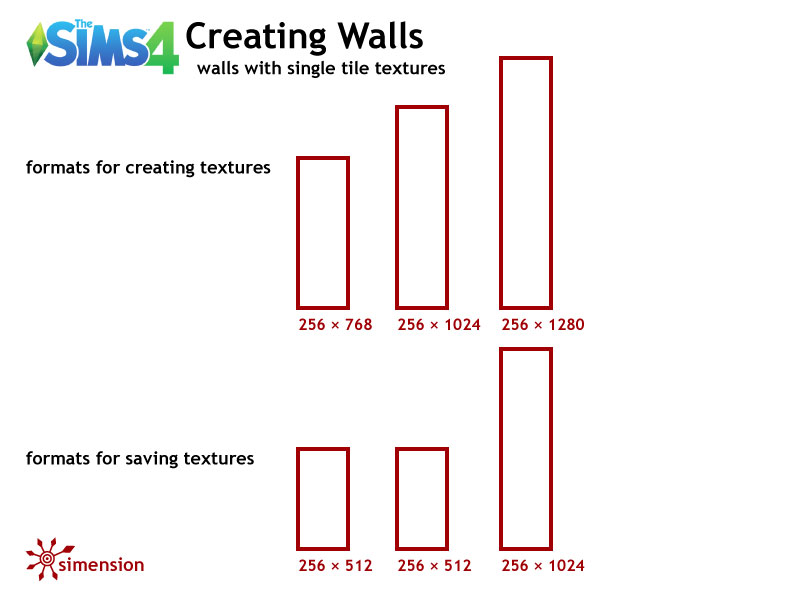
For creating single tile textures I start with a 256×1280px texture and make a pattern that is seamless to the right and the left side. When finished I cut off the top as much as needed for the other 2 sizes. Afterwards I resize all three textures to their saving formats and save them as dds-format.
Walls with wider textures
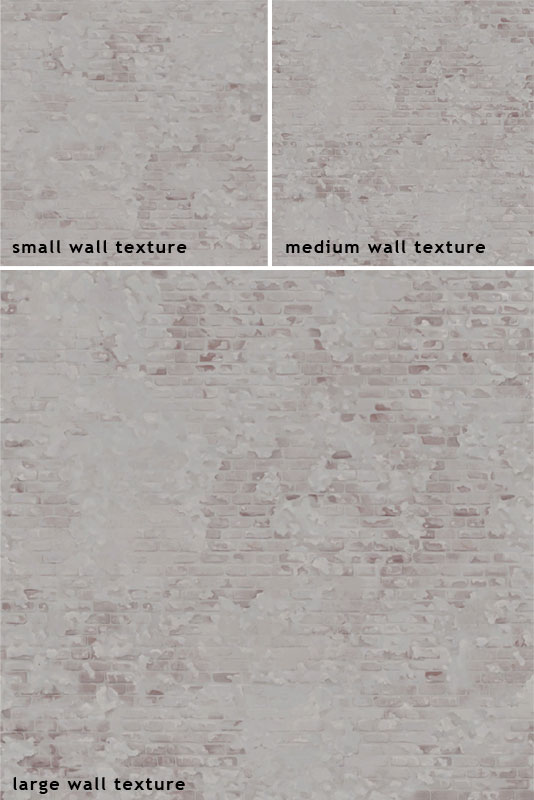
But there are also wall textures some consisting of 2 or 3 walls width. 2 times standard for the small walls, 3 times for middle and large wall size.
Fig. 3 Here are exports of the three wall heights with wider textures of an original wall:
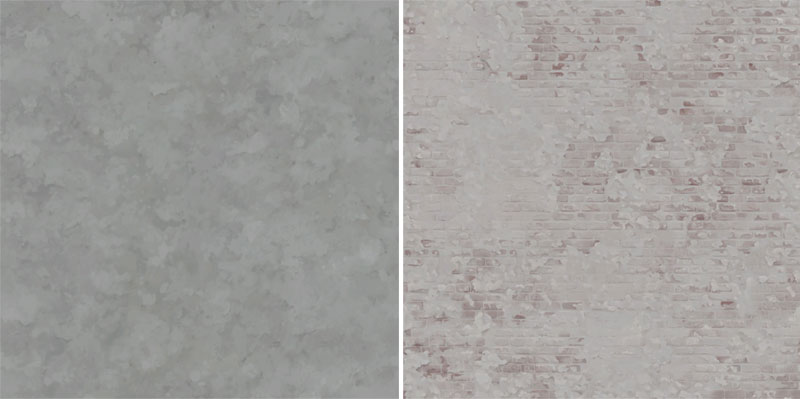
Wider Wall textures reduces visual repitition
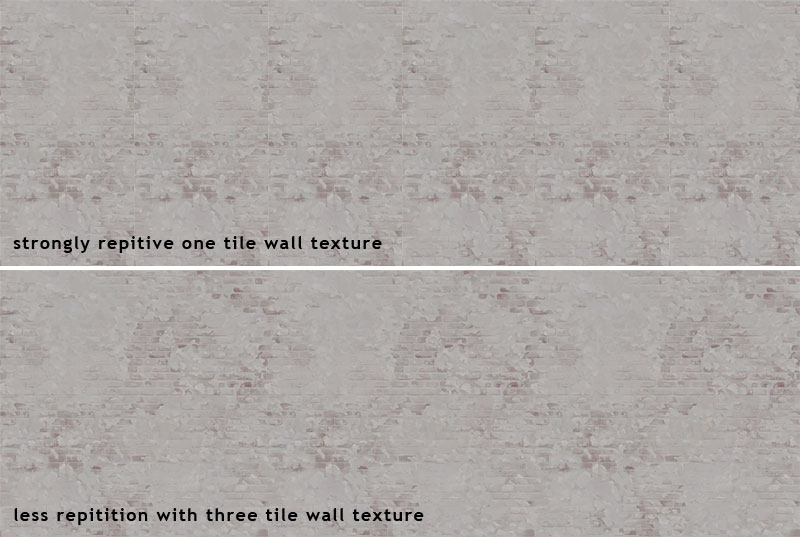
So what's the purpose of the wider textures? They reduce the repition on longer walls.
Fig. 4 Comparison of a one tile and multi tile texture
Creating wider wall textures
Same as for standard walls goes for wider walls. They will be stretched ingame and need to be created on larger canvases to not getting a wrongly scaled ingame look.
Fig. 5 Formats for creating and saving wider wall textures as far as i figured out
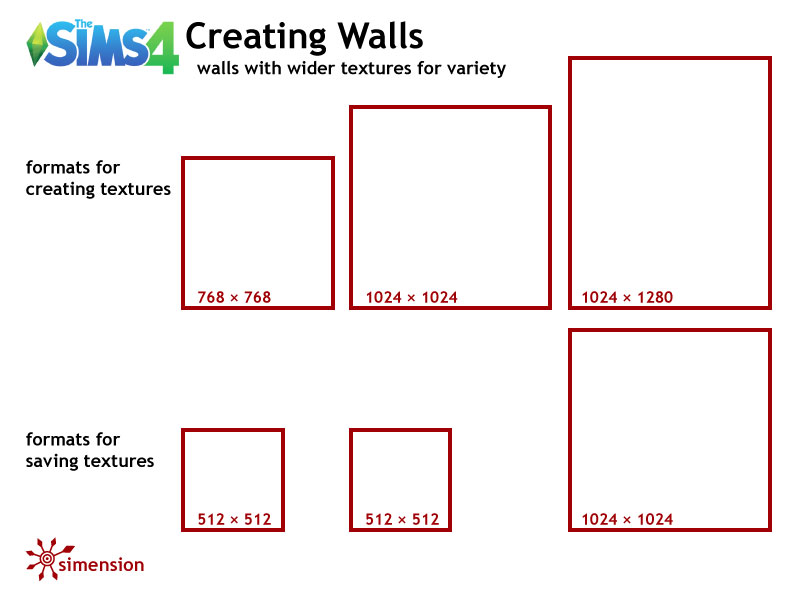
Creating wider walls is a bit more complicated as creating single tile textures. I start with 1024 × 1280px and make a pattern seamless to the left and right side. Those will do for large and middle size walls. When finished I cut of the upper part for the middle size.
Then I take the same large wall original into a new file of the small creation size. It does not has the same width (768 instead of 1024): one third is cut of. You can't just scale it, because this will result in smaller texture parts ingame giving a different impression of the wall. Have a look at the example of EAs original wide wall (Fig. 3) and you can see that the small version shows a smaller part of the texture. Because you cut one third off, you need to redo the seamlessness for the small texture.
When finished I can resize all three textures to their saving dimensions and save them as dds.
Limitations of wider wall textures
The potential of the wider textures seems limited though. I found only originals using it, where it does not matter (much) when the order is broken.
Fig. 6 Here are the 2 walls I found so far (first one has several recolors):
My own texture has a much higher need for displaying the correct order, when it comes to crossing corners. Sometimes it works, sometimes it brakes. The "funny" thing is, it depends on wall height: Even with exaclty the same textures parts on medium and large walls one might brake and the other works. Second it seems to depend on corner position. If you have more information, please share it.
Fig. 7 Here is my new wall textures with little tolerance for being broken:
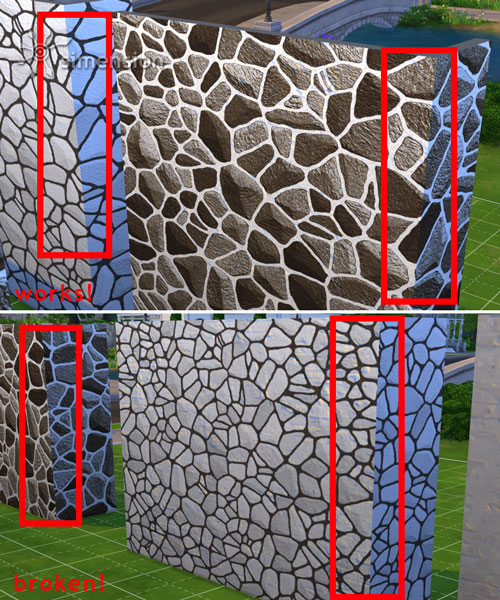
So far I think wider textures are reserved for textures with high braking tolerance.
Normal Maps and Specular Maps for Walls
Read the original Post by orangemittens
Wall with trims, tiled and brick walls often have a normal and or specular map. The normal map defines hights and depth and is usefull on bricks and rocks to give them more 3d effect. The specular map defines the shiny parts and is especially useful on tiles and materials made of glass or metal. Even flat walls might have those extra graphic files but often those are empty. Sims 4 Studio exports normal and Specular maps and allows you to edit them. All of the images associated with a wall, including bump and specular, can be exported at once with one click of the Export All button. This will arrange all of the walls in individual folders named by height. The only exception to this is walls that have an auto corner feature. Currently Studio is pulling the corner walls into the .package and those can be accessed from the Warehouse tab for export and import. If you want a wall to have auto-cornering you must clone a wall that has that feature already to use as the base for your wall.
Links
Please join the Discussion!
What I know nothing about yet but would love to:
Hope you join and enjoy the Sims 4 wall discussion here :-)!
Feel free to post links to tutorials, best practices, tipps and tricks as well. I am going to add wall tutorial links and links to your intructive posts here in the first post.
I am going to update this post as more information is gathered in this thread.
Simlish Greetings
simension
I love walls (and floors as well) and Sims 4 basegame is missing lots of the good ones. Currently I am working on new walls and on the way there is much to discover. First discovery I made on walls: There are 2 different kind of textures. I would like to share my discoveries with you fellow simmers and hope for your input as well. Let us explore techniques and develop best practices on wall creation together.
Topics covered in this Thread:
- Walls with standard textures
- Creting single tile textures
- Walls with wider textures
- Wider wall textures reduses visual repitition
- Creating wider wall textures
- Limitations of wider wall textures
- Normal Maps and Specular Maps for Walls
Walls with standard textures
The standard is the small one with 256px width.
Fig. 1 Here are exports of the three wall heights textures of an original single tile wall:
Creating single tile textures
Textures will be stretched ingame. Thus it is neccessary to create them as larger textures and compressing them before saving for the game.
Fig. 2 Creating Standard Walls
For creating single tile textures I start with a 256×1280px texture and make a pattern that is seamless to the right and the left side. When finished I cut off the top as much as needed for the other 2 sizes. Afterwards I resize all three textures to their saving formats and save them as dds-format.
Walls with wider textures
But there are also wall textures some consisting of 2 or 3 walls width. 2 times standard for the small walls, 3 times for middle and large wall size.
Fig. 3 Here are exports of the three wall heights with wider textures of an original wall:
Wider Wall textures reduces visual repitition
So what's the purpose of the wider textures? They reduce the repition on longer walls.
Fig. 4 Comparison of a one tile and multi tile texture
Creating wider wall textures
Same as for standard walls goes for wider walls. They will be stretched ingame and need to be created on larger canvases to not getting a wrongly scaled ingame look.
Fig. 5 Formats for creating and saving wider wall textures as far as i figured out
Creating wider walls is a bit more complicated as creating single tile textures. I start with 1024 × 1280px and make a pattern seamless to the left and right side. Those will do for large and middle size walls. When finished I cut of the upper part for the middle size.
Then I take the same large wall original into a new file of the small creation size. It does not has the same width (768 instead of 1024): one third is cut of. You can't just scale it, because this will result in smaller texture parts ingame giving a different impression of the wall. Have a look at the example of EAs original wide wall (Fig. 3) and you can see that the small version shows a smaller part of the texture. Because you cut one third off, you need to redo the seamlessness for the small texture.
When finished I can resize all three textures to their saving dimensions and save them as dds.
Limitations of wider wall textures
The potential of the wider textures seems limited though. I found only originals using it, where it does not matter (much) when the order is broken.
Fig. 6 Here are the 2 walls I found so far (first one has several recolors):
My own texture has a much higher need for displaying the correct order, when it comes to crossing corners. Sometimes it works, sometimes it brakes. The "funny" thing is, it depends on wall height: Even with exaclty the same textures parts on medium and large walls one might brake and the other works. Second it seems to depend on corner position. If you have more information, please share it.
Fig. 7 Here is my new wall textures with little tolerance for being broken:
So far I think wider textures are reserved for textures with high braking tolerance.
Normal Maps and Specular Maps for Walls
Read the original Post by orangemittens
Wall with trims, tiled and brick walls often have a normal and or specular map. The normal map defines hights and depth and is usefull on bricks and rocks to give them more 3d effect. The specular map defines the shiny parts and is especially useful on tiles and materials made of glass or metal. Even flat walls might have those extra graphic files but often those are empty. Sims 4 Studio exports normal and Specular maps and allows you to edit them. All of the images associated with a wall, including bump and specular, can be exported at once with one click of the Export All button. This will arrange all of the walls in individual folders named by height. The only exception to this is walls that have an auto corner feature. Currently Studio is pulling the corner walls into the .package and those can be accessed from the Warehouse tab for export and import. If you want a wall to have auto-cornering you must clone a wall that has that feature already to use as the base for your wall.
Links
Please join the Discussion!
What I know nothing about yet but would love to:
- How can we get rid of auto walls (game chooses another corner than I would) ingame?
- best clone bases
Hope you join and enjoy the Sims 4 wall discussion here :-)!
Feel free to post links to tutorials, best practices, tipps and tricks as well. I am going to add wall tutorial links and links to your intructive posts here in the first post.
I am going to update this post as more information is gathered in this thread.
Simlish Greetings
simension


 I hope you will not mind but I am going to put a link in my tutorial to your post so that people can look at the wall size illustration you've made. I could not explain it as well as your pictures do.


